Negative stain EM is a quick and relatively cheap way to assess protein homogeneity and behavior before proceeding to cryo-EM. It is carried out at room temperature, and at HRMEM we use the Talos microscope for negative stain. The protein is applied to a grid and coated in an electron dense stain, usually uranyl acetate or uranyl formate. The volume occupied by protein excludes the stain, giving a high contrast visualisation of the 3D structure of the protein.
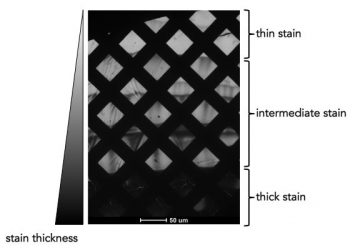
Gradient of thick and thin stain across a portion of a grid.
When looking at your negative stain grid at low magnification, you should be able to see the stain adhered to the squares of the grid. This will result in variation in the intensity of the squares. Stain thickness can vary across a grid, so move around your grid at low magnification to find a promising area.
If the grid appears black, this is an indication the stain is too thick and the electron beam cannot penetrate it. If the squares of the grid all appear the same bright colour and there is no variation in intensity, this is

Areas with stain “rivers” are often a good place to image.
often an indication that there is minimal or no stain present. Adjust how you blot the stain from the grid to change the stain thickness as needed. If there are geometric crystals present on the grid, this usually means the stain has dried too slowly.- try drying the grids in a fume cabinet or blotting off more stain.
Within a single square you may see some thicker and thinner stain, which often forms a ‘river-like’ pattern. The boundary between the thick and thin stain is often a good place to image.
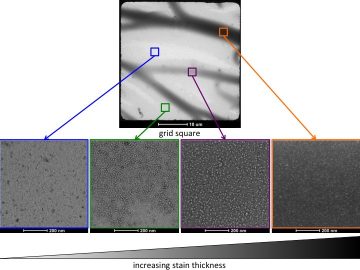
Differing stain thickness can alter the appearance of the same protein.
Ideally the protein should appear as white on an even, dark background. When the stain is too thin, the protein may appear as dark spots on a light background, but it can be hard to tell the shape of the protein, or if these spots represent your protein of interest or a contaminant. As the stain thickness increases, you may see your protein as light coloured shapes surrounded by a dark build up around them. While these are easy to identify by eye and give an overall idea of the shape and size of the protein, this stain thickness is not ideal as the protein may not be completely covered in stain and therefore information is being lost. When the protein is full embedded in the stain the background will appear uniform, and the particles will look white on a dark background. If the stain is too thick, the particles will still be lighter than the background but the contrast between particle and background will be poor.
Note that large multimolecular assemblies and filaments may be better visualized in thinner stain as dark shading around the particles.
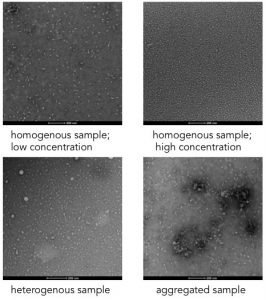
Examples of different sample behaviour on negative stain.
You should be able to see distinct particles in your image. The particles should be the same size and represent different views of the same 3D shape- i.e. the views can be related to each other through rotation of the object. The sample should appear homogenous- all the particles should appear as if they are views of the same object. Large disparities in the sizes of particle present indicates a heterogeneous sample. At this point, you should also check that the particles you are seeing are plausibly the protein you are interested in. Do the particles match us with the expected size and shape of your protein?
You can also use the images to assess concentration; ideally you would like a concentration such that you can see multiple copies of the protein in one image but not so high the proteins are touching each other, making it difficult to see distinct particles. If the protein is behaving well it should be evenly distributed on the grid. In contrast, aggregation of protein appears as large clumps.