You can expect your cryo-EM project to go through seven main phases:
- Choosing a target
- Negative stain screening
- Vitrification
- Cryo-grid screening and optimisation
- Initial data collection
- High-resolution data collection
- Data analysis
Every project is different, and the time you will spend on each phase of the project will depend on each unique sample and its specific requirements. Before beginning you will need to discuss your project with facility staff- filling out this project form will help give us a starting point of what you are trying to achieve. If you are not sure your project is appropriate for cryo-EM, please contact Claire for more information about project design by emailing ceatk@mail.ubc.ca.
A brief overview of the how the process typically works at HRMEM is given below.
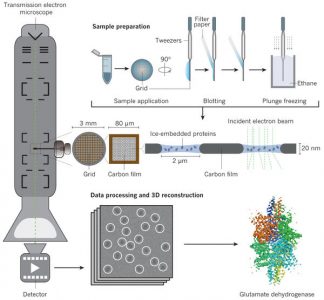
Overview of Cryo-EM process (Fernandez-Leiro and Scheres, Nature 2016)
Choosing a Target
The first step of a successful cryo-EM project is making sure the sample is amenable to cryo-EM. We will discuss your sample with you and what scientific questions you are hoping to answer. From there we can advise what you can expect to achieve with cryo-EM, and the next steps for your particular target.
Negative Stain Screening
Once we have identified a target for structure determination the first step is to assess the sample by negative stain EM. Negative stain EM is a quick and relatively cheap way to assess protein homogeneity and behaviour before proceeding to cryo-EM.
We have a Talos microscope for negative stain EM and we typically train users to operate this microscope independently so they can carry out their own screening. However, screening by facility staff is also available. Most users require 2-3 training sessions of ~3 hours each, but this can vary depending on your background and level of comfort. You can expect to use test samples in the first training session but after this you can bring your own samples to image. Independent use of the Talos is granted at the discretion of facility staff.
Negative stain microscopes are also available at the UBC Bioimaging facility.
Vitrification
If you can demonstrate that the sample looks good in negative stain, we will move on to plunge freezing your sample for cryo-EM using the Vitrobot. We train users to operate the Vitrobot independently, in 2-3 training sessions of ~3h each. Based on the nature of your sample we can help you determine which freezing conditions and/or protein concentrations to try first.
We can also freeze grids on your behalf, but as most projects require several rounds of freezing and optimisation we recommend that at least one user per lab learns how to operate the Vitrobot.
Screening of Grids
In a microscope screening session up to 11 grids will be loaded onto the Glacios and we will look at them to assess ice quality, appropriate protein concentration, and protein behaviour. The microscope will be operated by facility staff and we will update the user either in person or virtually in real time, so we expect users to be available to communicate with facility staff during microscope screening sessions.
We will start by taking low magnification overviews, or ‘atlases’ of each grid which will give us an idea of how thick the ice is across the grid. We will then take high magnification images of the sample at several locations across the grid to screen for protein behaviour in different ice thicknesses. Users will be provided with images from the screening session in a .jpeg or .tiff format for their records.
Screening and vitrification can often be an iterative process that involves the user re-optimising the sample for purity, behaviour, and/or trying different freezing conditions. We can advise users on different optimisation techniques to try.
Initial Data Collection
Once we have found freezing conditions that appear promising, we will collect an initial data set. This will usually be an overnight collection session of ~10-14 hours. This data set will give the user a sufficient number of particles for an initial analysis. This can reveal heterogeneity in the sample, and/or provide an initial model for the sample. If the analysis yields a high-quality initial model, this indicates the sample is a good candidate for high-resolution structural characterisation. The overnight collections can either take place either on the Glacios or the Krios microscopes.
High-resolution Data Collection
Once we are sure the sample is of good enough quality, we will set up a longer data collection. The aim of this is to get a large number of particles that contain high-resolution data which can then be used to reconstruct a high resolution structure. These data collection sessions will typically span several days. While the data collection is automated, the user is responsible for determining which areas to collect on, and is expected to be available while setting up the collection session for consultation. Longer collections are prioritised on the Krios, but the Glacios can be used when time is available. During the collection we will analyse the images coming from the microscope using cryoSPARC Live to asses quality and determine if there needs to be any changes to the collection strategy.
Data analysis
After data collection, we give the data to the user for analysis. We are unable to provide computational resources for data analysis and we cannot routinely analyse data on behalf of users. However, we do provide training in data analysis using a variety of software packages, principally Relion and cryoSPARC.